
Mechanisms on your layout

Set your layout
in motion

An opening gate, a rising barrier and a rotating exhibit. Connect mechanisms to the app and set motion to match the scale of your world.

Servos and moving parts
Movement on your modelModel scene

The servo raises the barrier and the vehicle drives through the gate.

Motion starts with a well-adjusted position

What you can do

From the first movement
to a complete sequence

Match the operating range to the mechanism. Then combine movements and effects.

Servo positions

Set positions that correspond to real points in the mechanism, such as an open and closed gate.

Range and calibration

Check the device's end positions and adjust the range before working with the whole scene.

Movement speed

Match the speed and motion profile to the supported drive and the character of the exhibit.

Different mechanisms

Control servos, turnouts and relays. Stepper motors require a suitable driver.

Movement in sequence

In PRO, arrange actions with delays. Open a gate, start the next element and complete the sequence.

Part of the show

In PRO, link movement to lighting and other actions so the mechanism becomes part of the story.

Ideas for your project

How will you use it
on your layout?

01

Level crossing barrier

Set positions for raising and lowering the barrier arm. In a larger scene, combine movement with the crossing lights.

02

Depot gate

Open the doors before the next part of the show starts. Match the timing and movement order to the model's mechanism.

03

Moving exhibit

Start rotation or a position change from the panel. Choose a drive suited to the weight and range of motion.

Devices and connections

From command
to movement

The controller sends commands to the PWM module, and the servo moves the mechanism. Servo power is separate from logic power; see the diagram for your board for details.

Signal flowMotion / 04 stages
  1. 01Control

    App

    Position and command

  2. 02Controller

    Arduino Uno

    USB connection

  3. 03Outputs

    PCA9685

    Control signal

  4. 04On the layout

    Servo

    Mechanism movement

What to prepare

Go to diagrams

Controller

Arduino or Raspberry Pi, according to the selected diagram.

PCA9685 and servo

The module generates the control signal. Choose a servo with the required torque and operating range.

Power supply and mechanism

Separate servo power, a common ground and proper mounting are part of the setup.

Additions for your project

Expand your layout

Hardware, effects and files from the catalogue. Match them to the devices and scenes you are working on.

Coming soon
Hardware and controllers

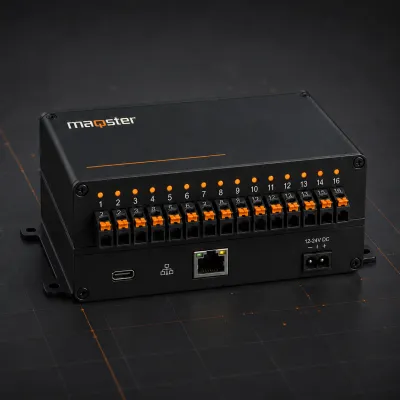
Input and output controller

16 configurable I/O channels for layout automation.

View product Coming soon

A moving exhibit as part of the story

For museums and exhibitions

Example scenario

A factory model could open a gate, reveal a machine cross-section and return the elements to their starting positions. An operator starts the agreed sequence from a panel. Movement should help explain the exhibit and fit the time visitors are likely to spend at the station, rather than add motion without a clear purpose.

What to prepare

A quotation needs the moving element’s mass, direction and travel, cycle frequency and mounting details. The drive, controller and power supply are selected before testing the end positions. Guards, maintenance access and the stopping method are specified separately. Test the mechanism before combining it with lighting or narration.

Scope and limits

Calibration in the app does not replace mechanical limits or an assessment of exhibit safety. A PCA9685 module provides a control signal, not drive power for any motor. A public exhibit also needs consideration of jams, wear and power-loss behaviour before visitors are allowed to trigger movement.

Questions before implementation

Can a large or heavy exhibit be controlled?

The mechanism, drive and drive controller must first be matched to the actual load. Compatibility cannot be confirmed from the object’s dimensions alone. A drawing, mass, required speeds and drive documentation are useful starting points.

Can visitors start the movement with a button?

That scenario can be planned once guarding and the conditions allowing movement are defined. The design needs to specify repeated presses, the end of a cycle and what happens if the mechanism stops in an unexpected position.

An implementation can be scoped and quoted now. The standalone Maqster app has not yet launched.

Enlarged view. On a small screen, scroll the diagram horizontally.

FREE · NEWSLETTER AND LAUNCH

We will let you know when
the app is ready

Sign up for the newsletter. After launch, we will email you a link to an account where you can download the app.

LET'S TALK ABOUT PRO

Your idea
PRO possibilities

Tell us about your model. We will help you choose the right application features and work out where to start.

  • Scenes and device control
  • Automation and integrations
  • A conversation about your project
maqsterLight. Motion. Sound.

We will reply to the email address you provide. Privacy policy.

Contact

Discuss control for your model

Tell us what you would like to do with your model layout. After a consultation, we will prepare a complete system tailored to your project.

  • Device and scene plan
  • Local control and configuration backups
  • Controllers, protocols and integrations