
Set your layout
in motion
An opening gate, a rising barrier and a rotating exhibit. Connect mechanisms to the app and set motion to match the scale of your world.
The servo raises the barrier and the vehicle drives through the gate.
Motion starts with a well-adjusted position
From the first movement
to a complete sequence
Match the operating range to the mechanism. Then combine movements and effects.
Servo positions
Set positions that correspond to real points in the mechanism, such as an open and closed gate.
Range and calibration
Check the device's end positions and adjust the range before working with the whole scene.
Movement speed
Match the speed and motion profile to the supported drive and the character of the exhibit.
Different mechanisms
Control servos, turnouts and relays. Stepper motors require a suitable driver.
Movement in sequence
In PRO, arrange actions with delays. Open a gate, start the next element and complete the sequence.
Part of the show
In PRO, link movement to lighting and other actions so the mechanism becomes part of the story.
How will you use it
on your layout?
Level crossing barrier
Set positions for raising and lowering the barrier arm. In a larger scene, combine movement with the crossing lights.
Depot gate
Open the doors before the next part of the show starts. Match the timing and movement order to the model's mechanism.
Moving exhibit
Start rotation or a position change from the panel. Choose a drive suited to the weight and range of motion.
From command
to movement
The controller sends commands to the PWM module, and the servo moves the mechanism. Servo power is separate from logic power; see the diagram for your board for details.
- 01Control
App
Position and command
- 02Controller
Arduino Uno
USB connection
- 03Outputs
PCA9685
Control signal
- 04On the layout
Servo
Mechanism movement
What to prepare
Go to diagramsController
Arduino or Raspberry Pi, according to the selected diagram.
PCA9685 and servo
The module generates the control signal. Choose a servo with the required torque and operating range.
Power supply and mechanism
Separate servo power, a common ground and proper mounting are part of the setup.
Expand your layout
Hardware, effects and files from the catalogue. Match them to the devices and scenes you are working on.

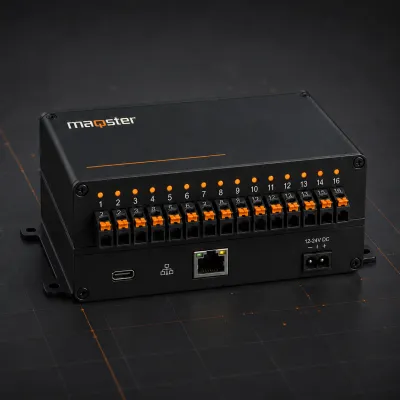
Input and output controller
16 configurable I/O channels for layout automation.
View product Coming soon
“City at Night” scene
A ready-made lighting and movement scene for your layout.
View category Coming soon