
DIAGRAMS / Raspberry Pi

Starter setup with PCA9685

Connect your first servo and LED. Check the controller pins and the separate servo power supply.

  1. 01Choose a system
  2. 02Choose a diagram
  3. 03Connect the devices
Selected systemRaspberry Pi
Change system
SELECTED VARIANT

Raspberry Pi + PCA9685

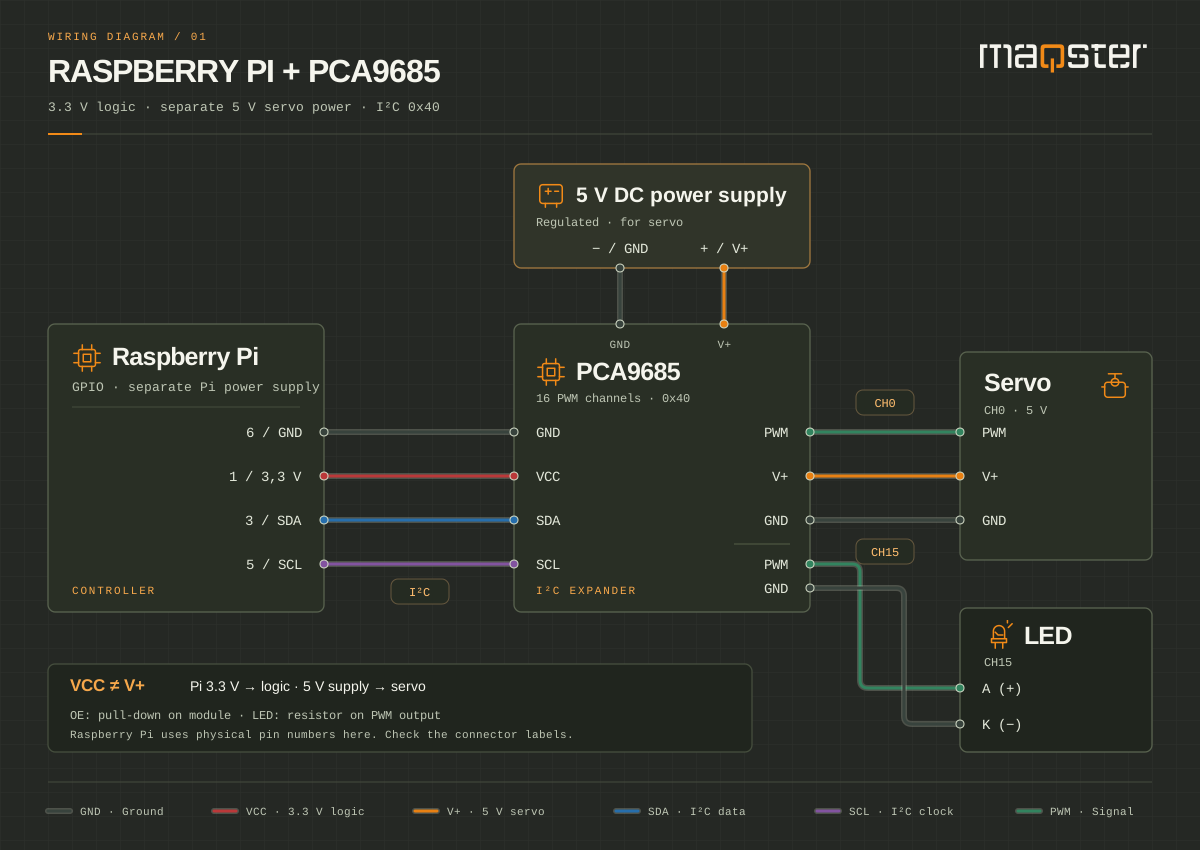
The Raspberry Pi connects to the PCA9685 via I2C and powers its logic at 3.3 V. A separate 5 V power supply powers the servo. The LED connects to CH15 on a module with a built-in series resistor.

WIRING DIAGRAM
Raspberry Pi with 40-pin GPIO: pin 1 (3.3 V) to VCC, pin 3 (GPIO2 / SDA1) to SDA, pin 5 (GPIO3 / SCL1) to SCL and pin 6 (GND) to GND on the PCA9685 module. Separate 5 V to V+, servo on CH0 and LED on CH15. Common ground.
The drawing shows electrical connections. Connector positions may vary by board manufacturer. Enlarge to read the pin labels.
  • GND Common ground
  • VCC 3.3 V logic
  • V+ 5 V servos
  • SDA I2C data
  • SCL I2C clock
  • PWM Output signal
PIN BY PIN

Wiring table

Colour helps you trace a wire. Pin labels determine the connection.

Connections for the Raspberry Pi variant
SignalFromTo
GNDRaspberry Pi · pin 6 (GND)PCA1 · GND (left connector)Common ground for logic and servo power.
VCCRaspberry Pi · pin 1 (3.3 V)PCA1 · VCC (left connector)
SDARaspberry Pi · pin 3 (GPIO2 / SDA1)PCA1 · SDA (left connector)
SCLRaspberry Pi · pin 5 (GPIO3 / SCL1)PCA1 · SCL (left connector)
GNDPower supply · − (GND)PCA1 · GND terminal
V+Power supply · +5 VPCA1 · V+ terminalV+ powers the servos, not the PCA9685 logic.
PWMPCA1 · CH0 PWMServo · signal
V+PCA1 · CH0 V+Servo · +5 V
GNDPCA1 · CH0 GNDServo · GND
PWMPCA1 · CH15 PWMLED · anode (+)No additional resistor. The diagram assumes a module with a series resistor on the PWM output.
GNDLED · cathode (−)PCA1 · CH15 GND
HOW TO WIRE THE CIRCUIT

Things to remember

01

Physical pins and GPIO

Use physical pins on the 40-pin header: 1 (3.3 V), 3 (GPIO2 / SDA1), 5 (GPIO3 / SCL1) and 6 (GND). A GPIO number is not its position on the header. Check the location of pin 1 on your board. This circuit is not for Raspberry Pi Pico or early boards with a 26-pin header.

02

3.3 V logic and servo power

Connect module VCC to Raspberry Pi 3.3 V. SDA and SCL may only be pulled up to 3.3 V. Do not connect VCC to V+ or the Pi's 5 V pins. Power servos separately via V+ and connect the grounds. A dedicated power supply powers the Raspberry Pi through its power socket. The PWM signal is at 3.3 V, so the servo must support it.

03

Enable I2C in Raspberry Pi OS

Run sudo raspi-config, choose Interface Options, then I2C and Yes. A module without address jumpers has address 0x40. In the control software, select bus I2C1 and the module's address. These are electrical wiring instructions; control requires software supporting PCA9685 on Raspberry Pi.

04

LED and servo on one module

The diagram assumes a module with 220 Ω resistors on its PWM outputs. The LED connects directly to CH15 and GND. The output is at 3.3 V; check the LED current and forward voltage. If there is no built-in resistor, add an external one. Set PWM according to the servo requirements, usually around 50-60 Hz. All channels share the frequency, so a dimmed LED may flicker.

05

Before connecting

Disconnect both power supplies. Check GPIO numbering, LED polarity and servo wires. OE may remain unconnected only on a module with a factory-fitted pull-down resistor; otherwise connect OE to GND according to the module documentation.

Enlarged view. On a small screen, scroll the diagram horizontally.

FREE · NEWSLETTER AND LAUNCH

We will let you know when
the app is ready

Sign up for the newsletter. After launch, we will email you a link to an account where you can download the app.

LET'S TALK ABOUT PRO

Your idea
PRO possibilities

Tell us about your model. We will help you choose the right application features and work out where to start.

  • Scenes and device control
  • Automation and integrations
  • A conversation about your project
maqsterLight. Motion. Sound.

We will reply to the email address you provide. Privacy policy.

Contact

Discuss control for your model

Tell us what you would like to do with your model layout. After a consultation, we will prepare a complete system tailored to your project.

  • Device and scene plan
  • Local control and configuration backups
  • Controllers, protocols and integrations